
QuickPic (Advanced)
-
Snap a quick-pic of precious moments, add a caption, and upload it directly to your site!


This app takes advantage of the PostFile method associated with the Web connectivity feature.
A separate PHP script will verify an access key and transfer specified files to the server where it is located.
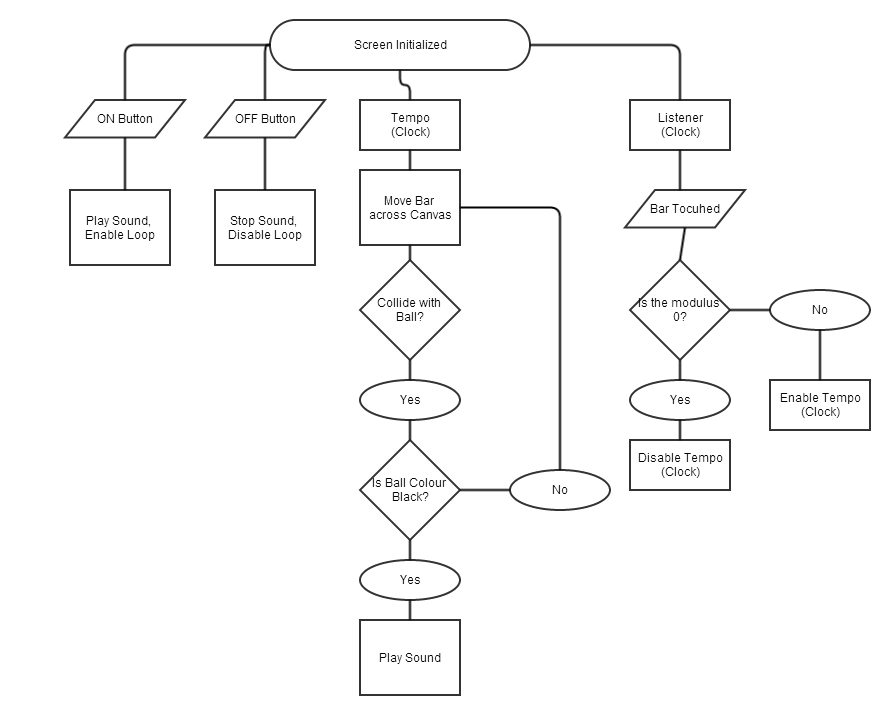
When the camera is used, it stores the image in a specific location. That location is stored as a label which is then modified as to retrieve the exact filename. This filename is appended to the URL were the PHP script is stored, and the file is uploaded.
When a photo is taken, it is immediately displayed in the canvas window where an effect and caption can be added.
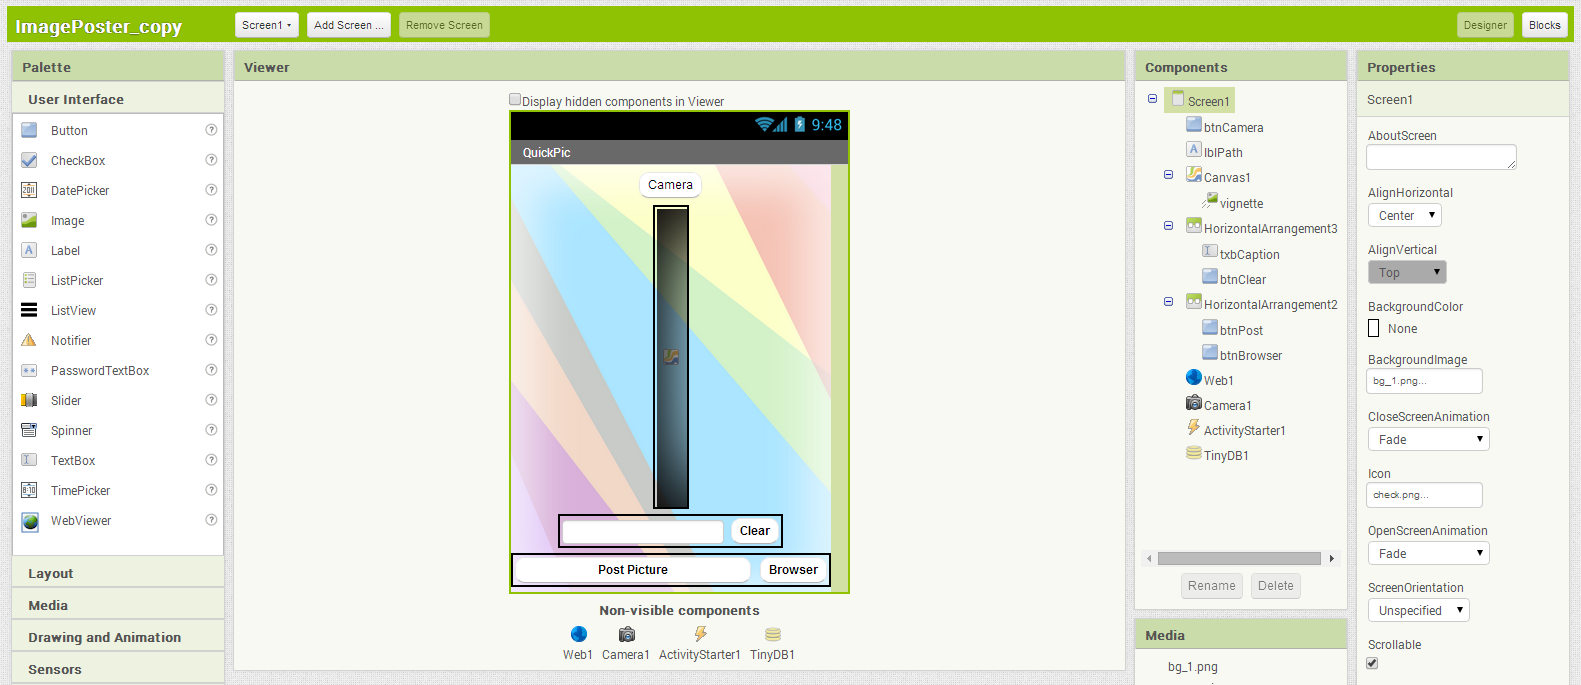
| Component | Palette | Name | Description |
|---|---|---|---|
| Label | User Interface | lblPath | Stores address to where image is stored. Hidden |
| Button | User Interface | btnCamera | Opens phone's built-in camera. |
| Button | User Interface | btnClear | Clears captions from image. |
| Button | User Interface | btnPost | Sends photo to website. |
| Button | User Interface | btnBrowser | Opens website in phone's built-in browser. |
| TextBox | User Interface | txbCaption | Allows user to add text their photo. |
| Canvas | Drawings and Animation | Canvas1 | Width = Automatic, Height = 300px |
| Media | Miscellaneous | vignette | Download vignette.png, Width = Automatic, Height = 300px |
| Web | Connectivity | Web1 | Non-visible component that provides functions for HTTP GET, POST, PUT, and DELETE requests. |
| Camera | Media | Camera1 | A component to take a picture using the device's camera. |
| ActivityStarter | Connectivity | ActivityStart1 | Non-visible component used to access phone's browser. |
| TinyDB | Storage | TinyDB1 | Stores data for an app. E.g. the photos you take. |

The first thing you'll need to do is initialize two global variables, strACCESSKEY and strFILENAME.
Use a text string to create a secret key that isn't easy to guess. An example with be "toronto".
Use a blank text string block for the filename.
Use a blank text string block for the filename.

Drag out the .Click event from btnCamera panel and add the .TakePicture function that is associated with Camera1.
Once that's done, drag out the .AfterPicture event from the Camera1 panel. This will do two very important things:
record the location of our photo, and open it in our Canvas for editing.
Set both lblPath.Text and Canvas1.Background to get image.
Set both lblPath.Text and Canvas1.Background to get image.
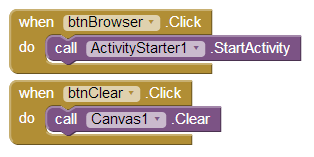
Next we'll add two more events; .Click for both btnBrowser and btnClear.
When btnBrowser is pressed, we want to open up our phones browser. This is done by calling .StartActivity procedure associated with ActivityStart1.
When btnClear is pressed, we want to clear all content from the image in our Canvas. This is easily done by calling .Clear for Canvas1.
When btnBrowser is pressed, we want to open up our phones browser. This is done by calling .StartActivity procedure associated with ActivityStart1.
When btnClear is pressed, we want to clear all content from the image in our Canvas. This is easily done by calling .Clear for Canvas1.
The next block will allow us to add captions to our photos. It will also control how our file is stored.
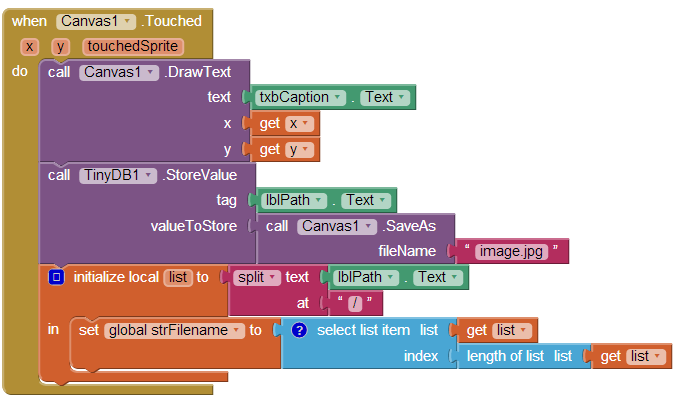
Drag out the .Touched event for Canvas1. Add the .DrawText procedure from the same panel. The .DrawText procedure has three variables: text, x, and y. The text will be whatever is in the caption box, so drag out the .Text block for txbCaption. We want the caption to be placed where ever you touch the image, so it's appropriate to set x to get x and y to get y.
Next, drag out the .StoreValue procedure for TinyDB1 and place it under your Canvas1.Touched event as well. We're going to set the tag variable to lblPath.Text, which is how the file (our photo) will be identified. The other variable is valueToStore; this will be the actual photo and caption currently open in the Canvas. Drag out .SaveAs filename from the Canvas1 panel. For the file name we'll use a generic text string with the file extension: image.jpg.
The lasts blocks are very important. Drag out an initialize local name to block from the Variables tab. Change name to list.
Then drag out a split text block from the Text panel and add it to the localized list variable that you just created.
Add lblPath.Text as the text input, and "/" stored as a text string. So the file path will be separated at the last "/".
Next we're going to make use of the strFilename variable that we declared at the beginning. Inside the local list variable, add a set strFilename to block. We want to grab each consecutive photo that is added to the list. Pull out a select list item block from the Lists panel. The index is where the file is located in the list. Since we want to updated with the newest photo each time, we simply need to call the last number, which is also the length of the list.
Next we're going to make use of the strFilename variable that we declared at the beginning. Inside the local list variable, add a set strFilename to block. We want to grab each consecutive photo that is added to the list. Pull out a select list item block from the Lists panel. The index is where the file is located in the list. Since we want to updated with the newest photo each time, we simply need to call the last number, which is also the length of the list.
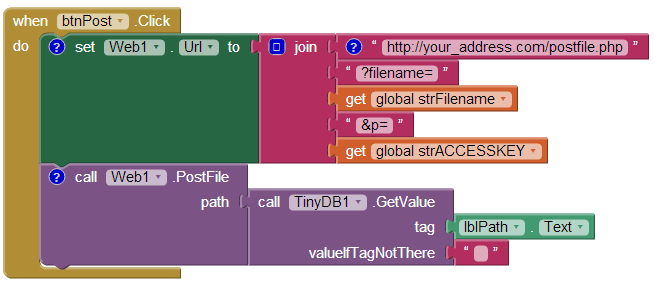
The final block will be used to actually upload our photo from your device to a website.
Drag out the set Web1.Url to and place it inside the .Click event for btnPost.
The URL needs to be an amalgamation of our website, filename, and access key. To do this, we will use a join block from the text panel.
Clicking the blue square will allow you to add more text strings. The first string NEEDS to be the path to PHP script that's hosted on your website! Lastly we'll add the call Web1.PostFile block. We'll set the path to the TinyDB1.GetValue procedure which will use the lblPath.Text as the tag, appropriately.
Clicking the blue square will allow you to add more text strings. The first string NEEDS to be the path to PHP script that's hosted on your website! Lastly we'll add the call Web1.PostFile block. We'll set the path to the TinyDB1.GetValue procedure which will use the lblPath.Text as the tag, appropriately.