Music Maker
-
An app that allows you to freely mix and match different beats to make original music!


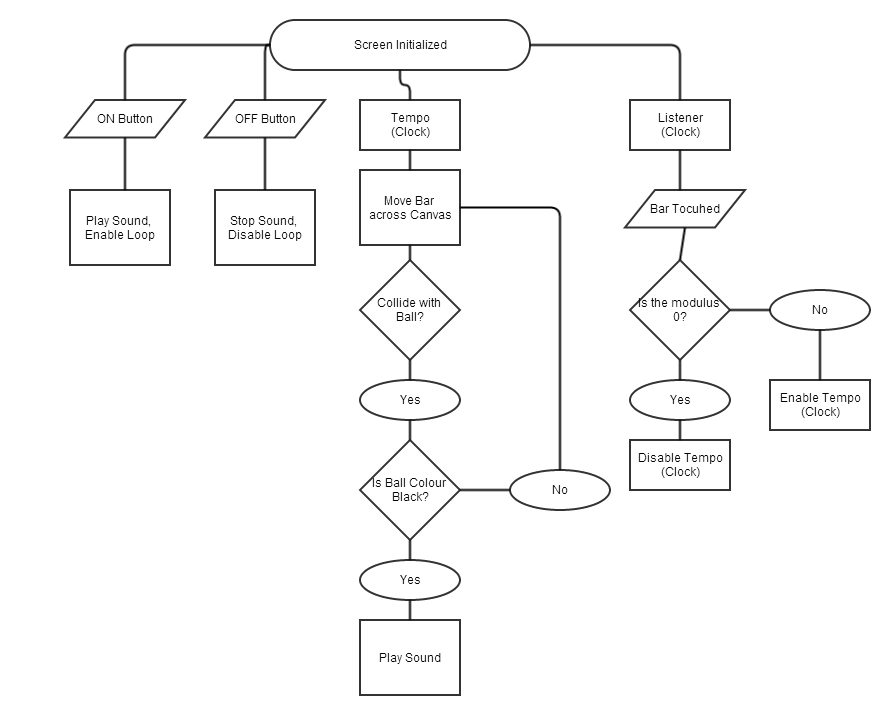
When the app is initialized, the Clock (Tempo) starts and the event sources and Canvas are loaded.
An ON and OFF button allows the user to loop a sound clip.
An image sprite in the form of a bar moves across a canvas and collides with objects (balls). These collisions are what trigger sound clips to play. The balls have listeners associated with them that allow for their colour to be changed upon being touched. A logic controller checks for the colour of the ball and will play a sound depending on its state. Essentially, it creates a music grid.
The interval at the which the bar collides with the balls can be changed, effectively changing the tempo.
| Component | Palette | Name | Description |
|---|---|---|---|
| Label | User Interface | lblLoop | Visual-only Label. |
| Label | User Interface | lblSnare | Visual-only Label. |
| Button | User Interface | btnON | Plays the sound in a loop. |
| Button | User Interface | btnOFF | Stops playing the sound. |
| Button | User Interface | btnTempo | Sends text input to change the interval of the tempo. |
| TextBox | User Interface | txbTempo | Always user to type custom tempo. |
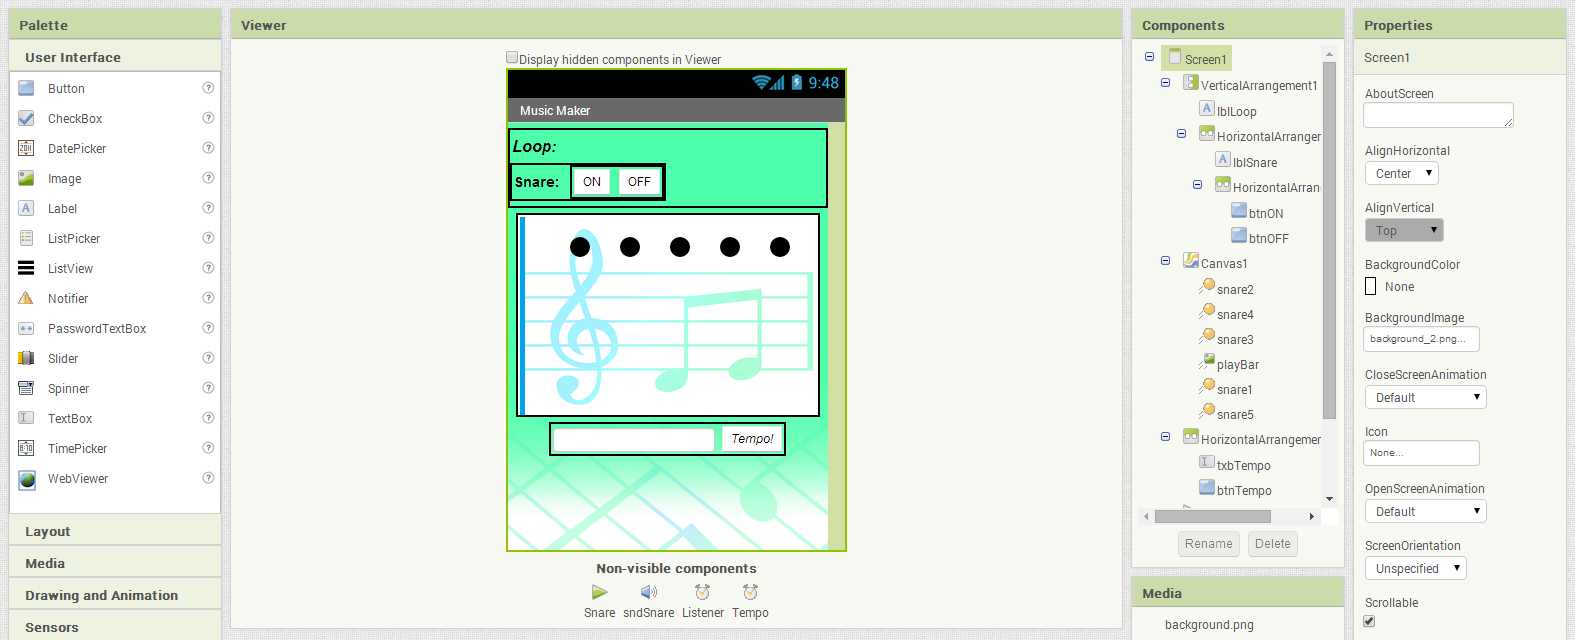
| Canvas | Drawings and Animation | Canvas1 | Width = 300px, Height = 200px |
| Ball | Drawings and Animation | Snare1, Snare2, Snare3, Snare4, Snare5 | Radius: 10, X = 50, 100, 150, 200, and 250 respectively, Y = 20 for all. |
| ImageSprite | Drawings and Animation | playBar | When the bar interacts with a ball, a sound will be played. Width = 5px, Height = 200px. |
| Player | Media | Snare | Linked to a sound file, plays when ON is clicked. |
| Sound | Media | sndSnare | Linked to a sound file, plays when ball and bar interact. MinimumInterval = 100 |
| Clock | Sensors | Listener | Allows for functions to be called multiple times. Interval = 10 |
| Clock | Sensors | Tempo | Controls the rate at which the playBar moves. Interval = 500 |
It's really simple to play music through App Inventor. Select the player object we named Snare.
In its properties window, both Loop and PlayOnlyInForeround should be unchecked. The following .mp3 can be uploaded as a Source.
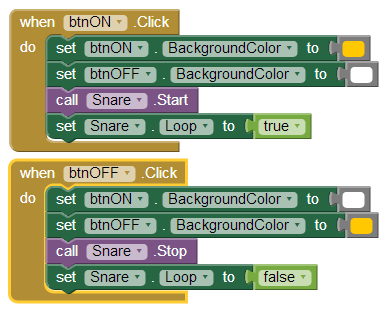
Next we'll drag out the .Start and .Stop functions for the Snare. We want the sound to play every time the ON button is clicked and to stop when the OFF button is pressed. Lastly, to keep our sound play consistently, we want to set the .Loop listener to true for the ON button, and false for the OFF button.
<-- Insert .mp3 file -->
Once you've done that, switch over to the Block Editor. Drag out a .Click event for the ON and OFF Buttons. To make it obvious to the user that a sound is playing, we will set the BackgroundColor of the ON button to orange and OFF to white whenever the ON button is clicked. We'll set the opposite properties for when the OFF button is clicked.Next we'll drag out the .Start and .Stop functions for the Snare. We want the sound to play every time the ON button is clicked and to stop when the OFF button is pressed. Lastly, to keep our sound play consistently, we want to set the .Loop listener to true for the ON button, and false for the OFF button.
This next part may look messy, but the logic is fairly straight-forward.
We want the bar to move across the Canvas and touch each ball in order to make a sound.
We have spaced each ball 50 pixels apart, so it makes sense that our bar should take steps that are 50 pixels in length.
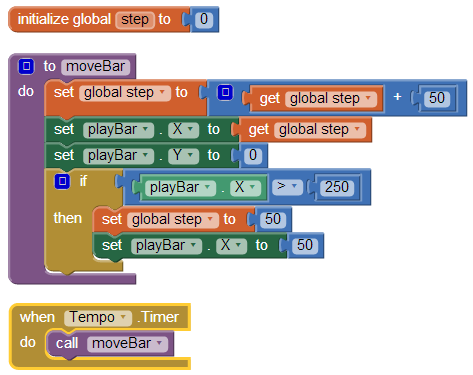
The first thing we want to do is initialize a global variable called Steps, set its value equal to 0. Select the Procedure panel and drag out a to-do function, call it moveBar. This variable will be directly related to the X position of the bar, so in order to move the bar horizontally, we must increase the value of step. Set the variable step equal to itself, plus 50 (thus increasing it by 50 each iteration). Keep the Y position of the bar at 0.
Add an if-then statement from the Control panel. We want to test if the bar has gone past the last ball. The furthest ball is at 250, so when the X position of playBar is greater than that, we want to return it to the beginning. Now, instead of resetting its X position to 0, we want to start at 50 instead. This will ensure even repetition. Set the variable step to 50 as well.
The most important part is to have the interval of the bar set to 500 initially. It needs to always have the same interval as the Tempo (Clock).

Now that we have the bar moving, we need to program what it does when it reaches a ball.
Drag out a .CollidedWith event from the playBar panel. By default, the input is labelled as other.
This means that the bar will perform an action when it collides with any object in the Canvas.
Drag out an if-then statement and add it to the collision event. What we need to do now is create the logic for when the bar hits a ball. In order to make this like a music grid - having the ability to toggle notes - we need give the collision special conditions. Since the colour of a ball can be easily changed, we'll us that as our toggle. By default, the shade of the ball will be black.
Drag out an AND statement. In the first space, add the .CollidingWith other function from the playBar panel. Then add the snare1 sound as its input.
For the second space, Add the = comparative operator from the Math panel. Using this, we will check if the shade of the ball is black. Colours can be dragged from the Colors panel, or typed out.
Repeat these steps for each ball.
This next part is fairly straight-forward. To create the music grid effect, we need to be able to tap the balls to change their colour.
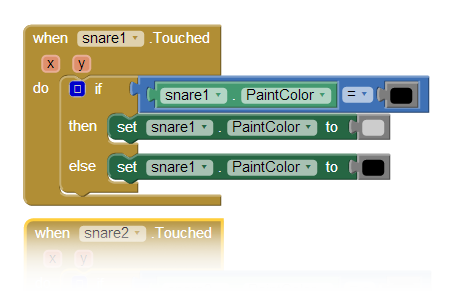
From their respective panel, drag out a .Touched event. Add an if-then statement to the event. Click the blue square to add an else statement.
We want to check the current colour of the ball. Drag out an = comparative operator and and attached it to the if statement.
Add the .PaintColor of the ball to one space and the shade black to the other. So, if the ball is currently black, then set the .PaintColor of the ball to grey.
Else, set the .PaintColor of the ball to black.
to add an else statement.
We want to check the current colour of the ball. Drag out an = comparative operator and and attached it to the if statement.
Add the .PaintColor of the ball to one space and the shade black to the other. So, if the ball is currently black, then set the .PaintColor of the ball to grey.
Else, set the .PaintColor of the ball to black.
Repeat these steps for each ball.
From their respective panel, drag out a .Touched event. Add an if-then statement to the event. Click the blue square
to add an else statement.
We want to check the current colour of the ball. Drag out an = comparative operator and and attached it to the if statement.
Add the .PaintColor of the ball to one space and the shade black to the other. So, if the ball is currently black, then set the .PaintColor of the ball to grey.
Else, set the .PaintColor of the ball to black.Repeat these steps for each ball.
With the blocks in place already, the app should be functioning as intended.
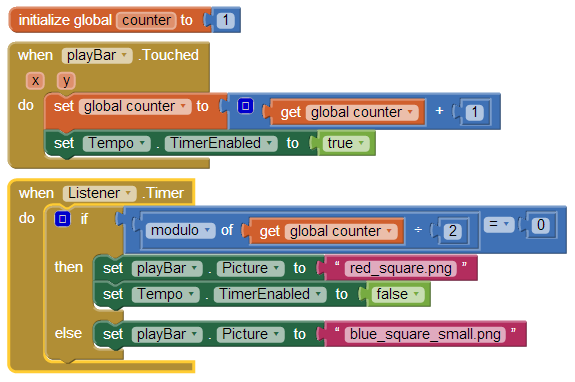
These next blocks give us the option to pause the playBar. Initialize a global variable called counter. Set its value equal to 1.
Drag out a .Touch event for the playBar. We need to change the value of the counter variable everytime the bar is touched.
Set the counter equal to the addition of itself, plus 1. So everytime the bar is touched, the coutner increases by 1.
At the same time, we want to set the boolean value of .TimerEnabled of the Tempo to TRUE. this will act as an ON switch.
Next, we will make use of the Listener clock. This will be running constantly at 10 ms intervals. Since 1 is added to the counter every time the bar is touched, it will be alternating between even and odd integers. This makes for an great toggle. Drag out the .Timer event for Listener. Include an if-then-else statement. For the if statement, we want to check the modulus [**Link**] of the counter when divided by 2. If the modulus of the counter is 0, then we know the counter is an even integer. When this is true, we want to change the .TimeEnabled value of the Tempo to FALSE. Additionally, we'll change the .Picture of the bar to the red image, as to make it apparent that the bar has stoppped. In the else statement, simply set the .Picture of the bar back to the blue image.
Next, we will make use of the Listener clock. This will be running constantly at 10 ms intervals. Since 1 is added to the counter every time the bar is touched, it will be alternating between even and odd integers. This makes for an great toggle. Drag out the .Timer event for Listener. Include an if-then-else statement. For the if statement, we want to check the modulus [**Link**] of the counter when divided by 2. If the modulus of the counter is 0, then we know the counter is an even integer. When this is true, we want to change the .TimeEnabled value of the Tempo to FALSE. Additionally, we'll change the .Picture of the bar to the red image, as to make it apparent that the bar has stoppped. In the else statement, simply set the .Picture of the bar back to the blue image.
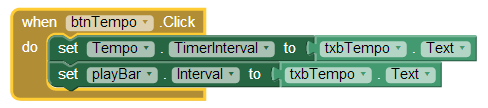
The last feature that we'll add is the ability to change the Tempo.
It's as simple as adding a .Click event for the btnTempo button.
Within it, set the .TimeInterval of the Tempo to the .Text of the txbTempo textbox.
Do the same for the .Interval of the playBar.
Now you can easily type in the tempo you want. The minimum tempo is determined by the MinimumInterval of the sound clip, in this case it's 100.
Now you can easily type in the tempo you want. The minimum tempo is determined by the MinimumInterval of the sound clip, in this case it's 100.