


16x2 LCD Twitter Client – Tweet to my door (Raspberry Pi)
Objective:
The end goal of this project is to build a device that will display tweets on a 16x2 character LCD screen. This screen is small and can therefore be mounted on a door or at the side of a desk. Along the way, the engineering student will learn how to program a Raspberry Pi in Python. They will get involved in the world of embedded Linux and understand how to use the Twitter OAuth API.
The Raspberry Pi was chosen because of its low price and active community. The Raspberry Pi has built-in Ethernet and a 26 pin general purpose input/output (GPIO) header. These features allow the engineering student to connect to the Internet and connect to a HD44780 compatible LCD display. Furthermore, the Raspberry Pi runs Linux so it's compatible with a wide variety of software.
Python was chosen as the programming language because it has a gentle learning curve. The beginner programmer does not need to know about pointers or other low level mechanics to make a program work. The tweepy library is available for Python so this makes it easier for the beginner programmer as they need not create the HTTP requests themselves.
Description of project:
This project uses the OAuth API to get tweets from a users Twitter feed. It then sends them as signals on the GPIO header to the LCD where they are displayed. The LCD is small in physical size and can be mounted in many places such as on a door. This is useful for a person who would want to leave a message on their door without actually going to their door. As long the person can access Twitter, they can change what their door says from anywhere in the world. An example would be if a person were in a meeting, they could update their door without leaving the meeting telling anyone who wants to visit the person that they are unavailable.
This could also be modified to follow somebody else's Twitter feed. One could follow a news feed on Twitter and the LCD display would give them live news updates right on their desk.
When the student completes the lab they will have learned about engineering design processes. They will understand how the project works and they will be inspired to make innovations. Knowing about how the hardware and software works, they will be able to adapt it to their own needs.
Hardware Components:
- Raspberry Pi with Internet access – to get data from Twitter
- 16x2 character LCD display - receives commands from the Raspberry Pi and displays tweets for the user – http://canada.newark.com/lumex/lcm-s01602dsf-f/display-alphanumeric-16-x-2/dp/19J7638?MER=PPSO_N_P_EverywhereElse_None
- 5kΩ trimmer - adjusts contrast by adjusting voltage at pin 3 (V0) on the LCD display
- Solderless breadboard – to hold trimmer and make connections.
- Wire – for connecting everything together. Cutting a breadboard wire short will allow the student to connect it to the GPIO header on the Raspberry Pi.
Software Components:
- Python 2.7 – To run our script to get tweets from twitter and send them to the LCD - http://www.python.org/
- Tweepy python library – to allow our python script to communicate with Twitter - https://pypi.python.org/pypi/tweepy/2.1
- Raspbian Linux - http://www.raspberrypi.org/downloads
Tools:
- Soldering tool, solder and flux – for connecting wires to the LCD
- Wire stripper – for removing insulation from wires
- A way to communicate with the Raspberry Pi – either ssh connection from a computer or external monitor, keyboard and mouse
Method:
- Create a Twitter account for this project.
- Go to www.twitter.com and fill in the sign-up form. Validate the account by clicking on the link sent to your email.
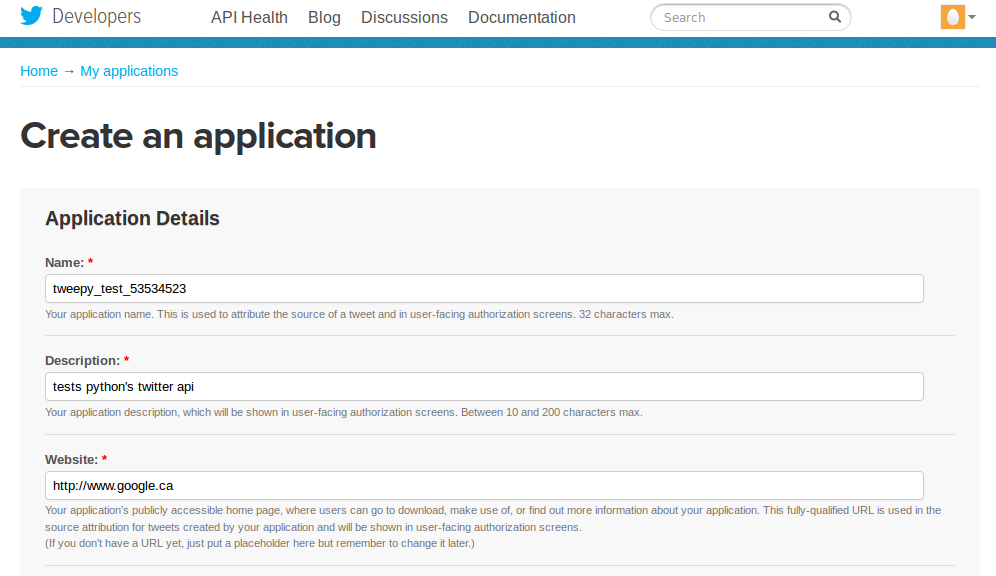
- Create a Twitter application for this project.
- Go to https://dev.twitter.com/apps/new and login.
- Give the application a name, description and website. The URL of the website is not important. Leave Callback URL blank.
- Accept the “Developer Rules of the Road”
- Complete the CAPTCHA and press next
- Get the OAuth keys
- Leave the Access Level to read-only
- Click on “Create my access token”
- Copy the Consumer key, Consumer secret, Access token and Access token secret into a place where they will be remembered.
- Add the application to your account
- Go to https://twitter.com/settings/applications and verify that the application has access

- Install tweepy on Raspberry Pi – in Linux terminal on Raspberry Pi type: sudo pip install tweepy and press enter
- Add the OAuth keys to the Python script.
- Open the file twitter_lab_test.py in an IDE such as Geany and complete the following lines:
- CONSUMER_KEY = '<Consumer key>'
- CONSUMER_SECRET = '<Consumer secret>'
- ACCESS_KEY = '< Access token>'
- ACCESS_SECRET = '< Access token secret>'
- Where <variable> are the keys from step 3
- Save the file
- Test out the application.
- Go to your Twitter page (https://twitter.com/<twitter username>
- Click on “compose new tweet” button on the top right corner and tweet something.
- Copy twitter_lab_test.py onto the Raspberry Pi.
- Open the directory on the Raspberry Pi. Type: python twitter_lab_test.py and press enter. If your tweet is displayed in the terminal, everything is working.
- Solder wires to the LCD.
- For each wire do the following:
- Strip away about 0.5cm of insulation
- Twist the wire so that all the strands are together.
- Apply a small amount of flux to the wire.
- Feed the wire through the appropriate hole on the LCD.
- Apply a small amount of solder to the tip of a soldering tool and press the solder into the joint to secure the wire into the hole.
- Do this for LCD holes: 1,2,3,4,5,6,11,12,13 and 14.
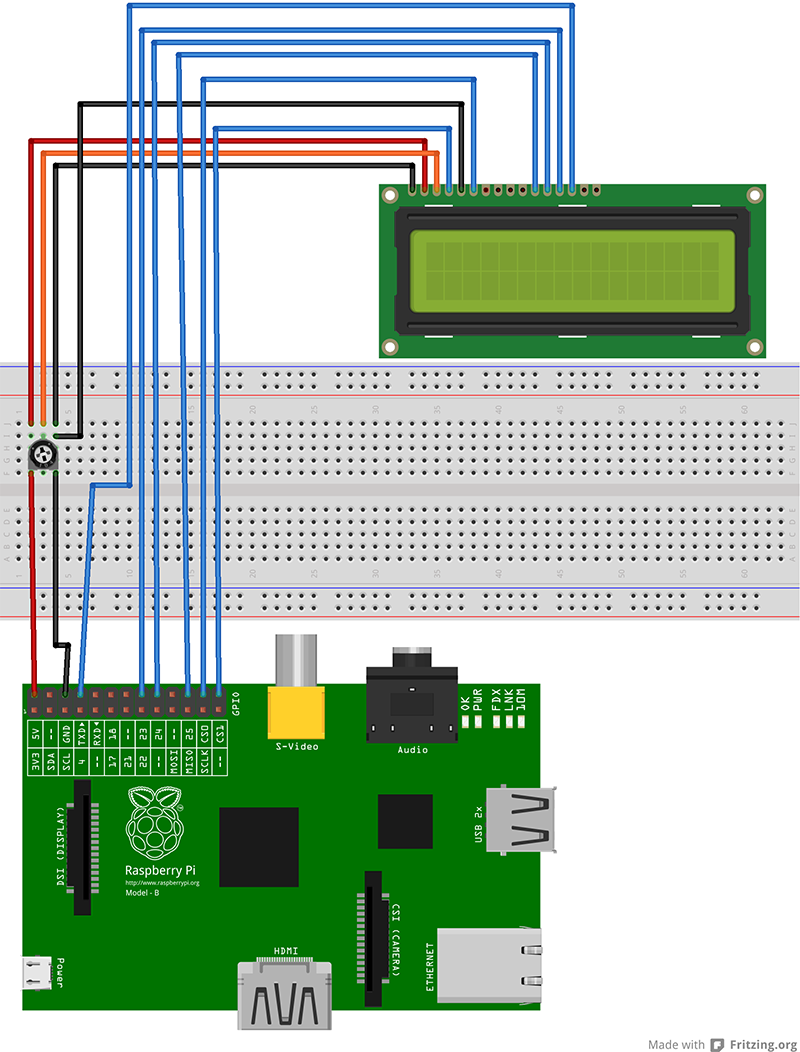
- Connect the LCD to the Raspberry Pi – Refer to the pinout. Do this with the Raspberry Pi unplugged.
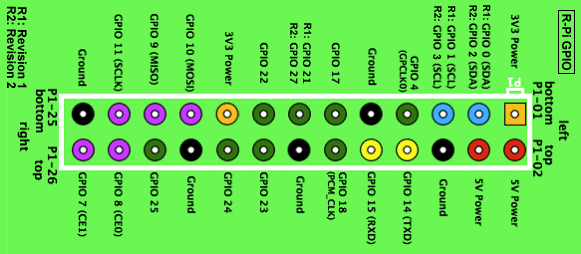
http://elinux.org/RPi_Low-level_peripherals
- 1. Connect the wire from LCD pin 1 (Vss) to GND on the Raspberry Pi by going through the breadboard.
- Connect the wire from LCD pin 2 (VDD) to 5V on the Raspberry Pi by going through the breadboard.
- Connect the 5kΩ trimmer so that the two ends, pins 1 and 3, and connected to 5V and GND respectively.
- Connect the wire from LCD pin 3 (V0) to pin 2 on the 5kΩ trimmer.
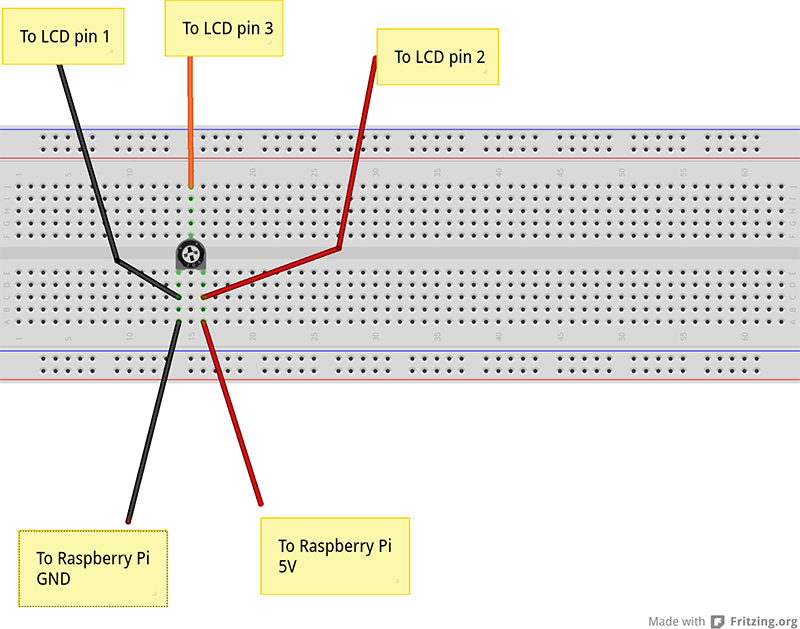
- This should look as follows
- Connect the wire from LCD pin 4 (RS) to Raspberry Pi GPIO07.
- Connect the wire from LCD pin 5 (R/W) to Raspberry Pi GND.
- Connect the wire from LCD pin 6 (E) to Raspberry Pi GPIO08.
- Connect the wire from LCD pin 11 (D4) to Raspberry Pi GPIO25.
- Connect the wire from LCD pin 12 (D5) to Raspberry Pi GPIO24.
- Connect the wire from LCD pin 13 (D6) to Raspberry Pi GPIO23 .
- Connect the wire from LCD pin 14 (D7) to Raspberry Pi GPIO14.
- This should look as follows:

- Prepare the Raspberry Pi Software
- Copy the file config_pins.py to the Raspberry Pi under the directory /etc/init.d
- Run the command: sudo update-rc.d config_pins.py defaults 100
- This will make the required GPIO pins available to non-root userspace.
- Reboot the Raspberry Pi to make the changes effective.
- Make it display tweets.
- Open the file Twitter_LCD_noroot.py in a programming IDE.
- Repeat the steps from step 5 for entering the keys.
- Copy the file Twitter_LCD_noroot.py to the Raspberry Pi.
- Copy the file SafeGPIO.py to the Raspberry Pi, under the same directory as Twitter_LCD_noroot.py
- Open the directory where Twitter_LCD_noroot.py is found in a terminal and type: python Twitter_LCD_noroot.py
- With a flat-tip screwdriver turn the trimmer until the LCD display becomes readable.
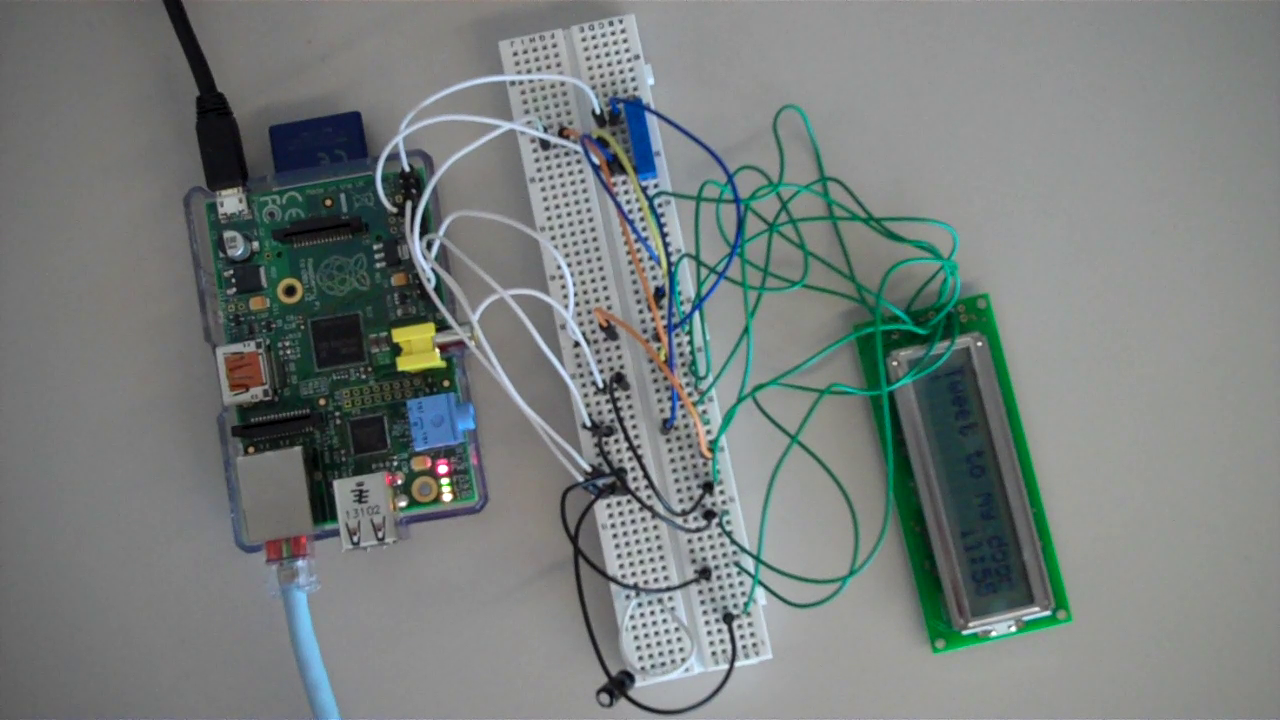
- If all is working, the first 26 characters of your latest tweet is displayed on the LCD along with the time that it was tweeted.
- Make it automatic.
- Make the file Twitter_LCD_noroot.py executable. Open it's directory in a terminal and type: chmod 755 Twitter_LCD_noroot.py
- Create the “lcdtwitter†user. Run the command sudo adduser lcdtwitter on the Raspberry Pi.
- Login as “lcdtwitter†and type the command crontab -e
- Add the following line:
*/1 * * * * /<path>/<to>/Twitter_LCD_noroot.py replacing <path>/<to>/ with the path to Twitter_LCD_noroot.py - Press Ctrl+O.
- Press enter.
- Press Ctrl+X
- The LCD will now be automatically updated every minute.
Final Product:
Areas for improvement:
This lab teaches the student many different concepts related to electrical and computer engineering. They will learn about the basics of these fields so that they will be able to learn more advanced concepts in these fields. With this new knowledge of electrical and computer engineering the student may wish to make the following modifications:
• The LCD screen only displays the first 26 characters of a tweet. With a bit of extra coding, the LCD screen could scroll the tweet so that the entire thing can be read.
• The LCD screen has support for an LED backlight. An improvement would be to make the backlight go on when it's dark by adding a photo-resistor.
• Adding a color and graphical LCD screen would be more aesthetically pleasing.
• Remove the solderless breadboard by soldering everything on a regular breadboard and use a header to plug into the Raspberry Pi.
This project would be appropriate for high school students in grades 11 and 12. Physics and computer science courses are available for these students so that they will be able to follow along with the concepts described in this lab.