


Lab Manual – Arduino Lilypad Remote Mouse
Objective:
The goal of this project is to build a remote-control that will control a cursor in place of a computer mouse. The project will use capacitive touch to implement buttons and the data will be transmitted wirelessly over infrared light. By doing this project, the student will learn about wireless optical communication and capacitive touch sensors.
The Arduino development platform was chosen for our development board because it is open-source and has a large community which has written lots of code to implement functionality. Also, answers to many Arduino related problems can be found on many forums. Specifically, the Lilypad was chosen as the microcontroller in the remote-control because it has an artistic appeal as well as large contacts which allow for simple implementation of capacitive touch sensing. The Arduino Lilypad was also designed so that it could be sewn on to fabric and circuits could be created with conductive thread. This allows for the creation of a “soft” remote-control. In this project, the ATMEGA328P microcontroller is removed from the Arduino UNO and the UNO is simply used as an FTDI converter. This allows the student to program the Arduino Lilypad, and then, implement a receiver base station for the project.
The Arduino Lilypad is programmed in its native “C++ like” language, and a simple Python script uses the PyMouse library to control the cursor.
Description of project:
When a user holds the Arduino Lilypad in their hand and touches a pad, the capacitance of that pad increases. This means that the time that it takes for the pin to charge up to its full voltage increases when it is touched. This is implemented in the microcontroller by setting the voltage of the pin to zero and then setting it back to its full value. The microcontroller counts how long it takes for the pin to rise to its full voltage. If the time is above a certain threshold, the event is interpreted as a “button press”.
A character corresponding to the button that was pressed is transmitted as an FTDI signal. This signal controls an infrared LED and the data is transmitted wirelessly. On the receiving end, an infrared phototransistor varies the amount of current that is let through depending on the amount of infrared light that is receives. This signal is then inverted (HIGH becomes LOW and LOW becomes HIGH) and then is fed into the TX pin of the Arduino UNO. The signal that is received is the same signal that was transmitted out of the Arduino Lilypad to the infrared LED.
The USB-to-serial converter on the Arduino UNO sends this data, the same data that was transmitted from the Arduino Lilypad, to the USB port on the computer where a Python script interprets the data and makes the appropriate calls to the PyMouse library in order to control the mouse.
Hardware Components:
Arduino UNO
Arduino Lilypad
Infrared LED
Infrared Phototransistor
Visible color LED (as indicator, optional)
NPN transistor
2x 100Ω resistors
2x 10kΩ resistors
USB Cable A to B
Computer with a USB port, capable of running a Linux distribution such as Ubuntu
Solderless breadboard
Reflective surface
Software Components:
Linux distribution such as Ubuntu
Arduino Programming IDE
Python
PyMouse library for Python
Method:
Program the Arduino Lilypad.
With a flat-tip screwdriver, very carefully remove the ATMEGA328P from the Arduino UNO by placing the screwdriver under the chip and twisting slowly. Work from both sides of the chip and don't use excessive force. Do not bend the pins. Once the chip is removed place it on a solderless breadboard and put it in a safe place.
Connect the Arduino Lilypad to the Arduino UNO by following the given schematic. Then connect the Arduino UNO to the computer via the USB cable.
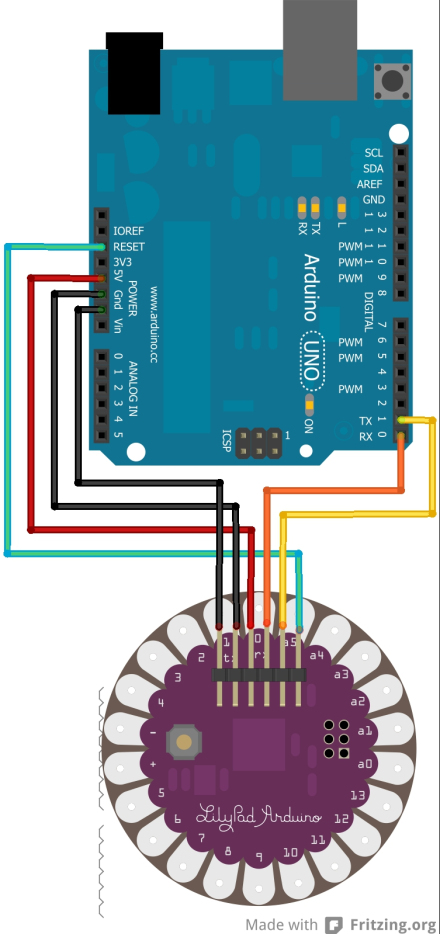
Source: http://theelectronicbyte.wordpress.com/2013/03/08/so-youve-got-yourself-a-lilypad/
Open the file LilyPad_Remote_sketch/LilyPad_Remote_sketch.ino in the Arduino IDE.
In the Arduino IDE go to Tools-->Board and select Lilypad Arduino w/ ATMEGA328.
Click on the Upload button to upload the program onto the Arduino Lilypad
Test the capacitive touch sensors.
In the Arduino IDE, open the Serial monitor and set the baud rate to 1200. Pressing the following pads on the Arduino Lilypad should result in the following characters being printed.
Pad
Character printed
3
A
5
B
9
C
12
D
7
L
11
R
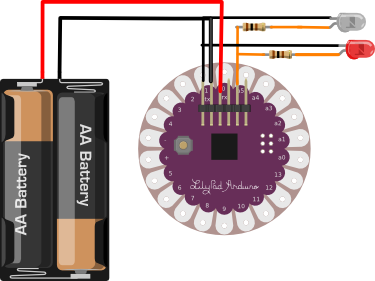
Build the transmitter by following the given schematic.
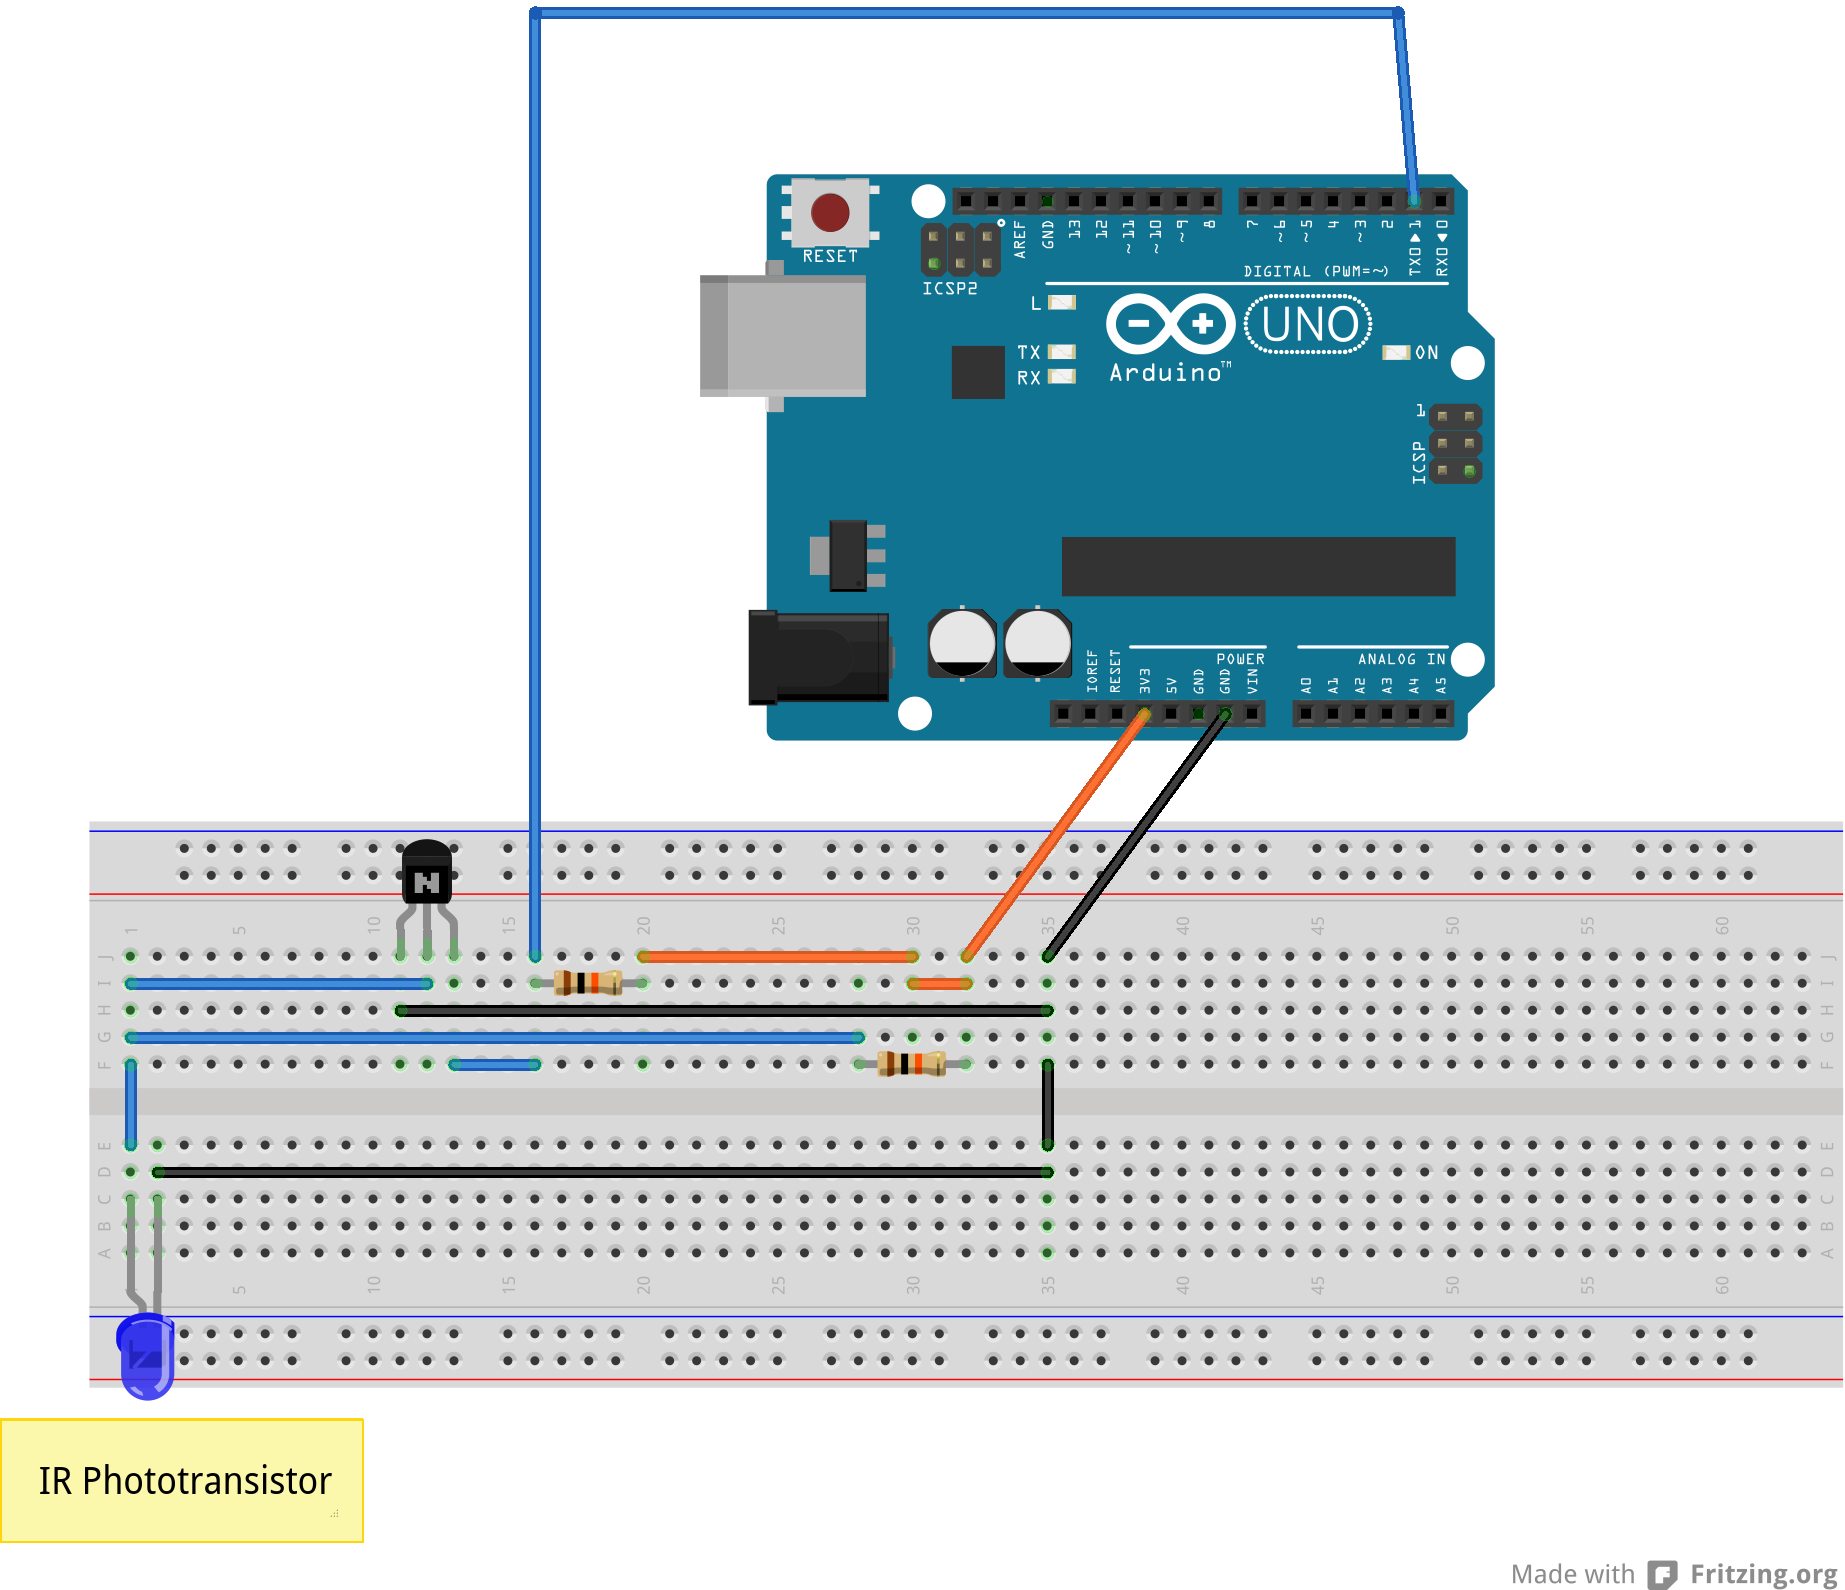
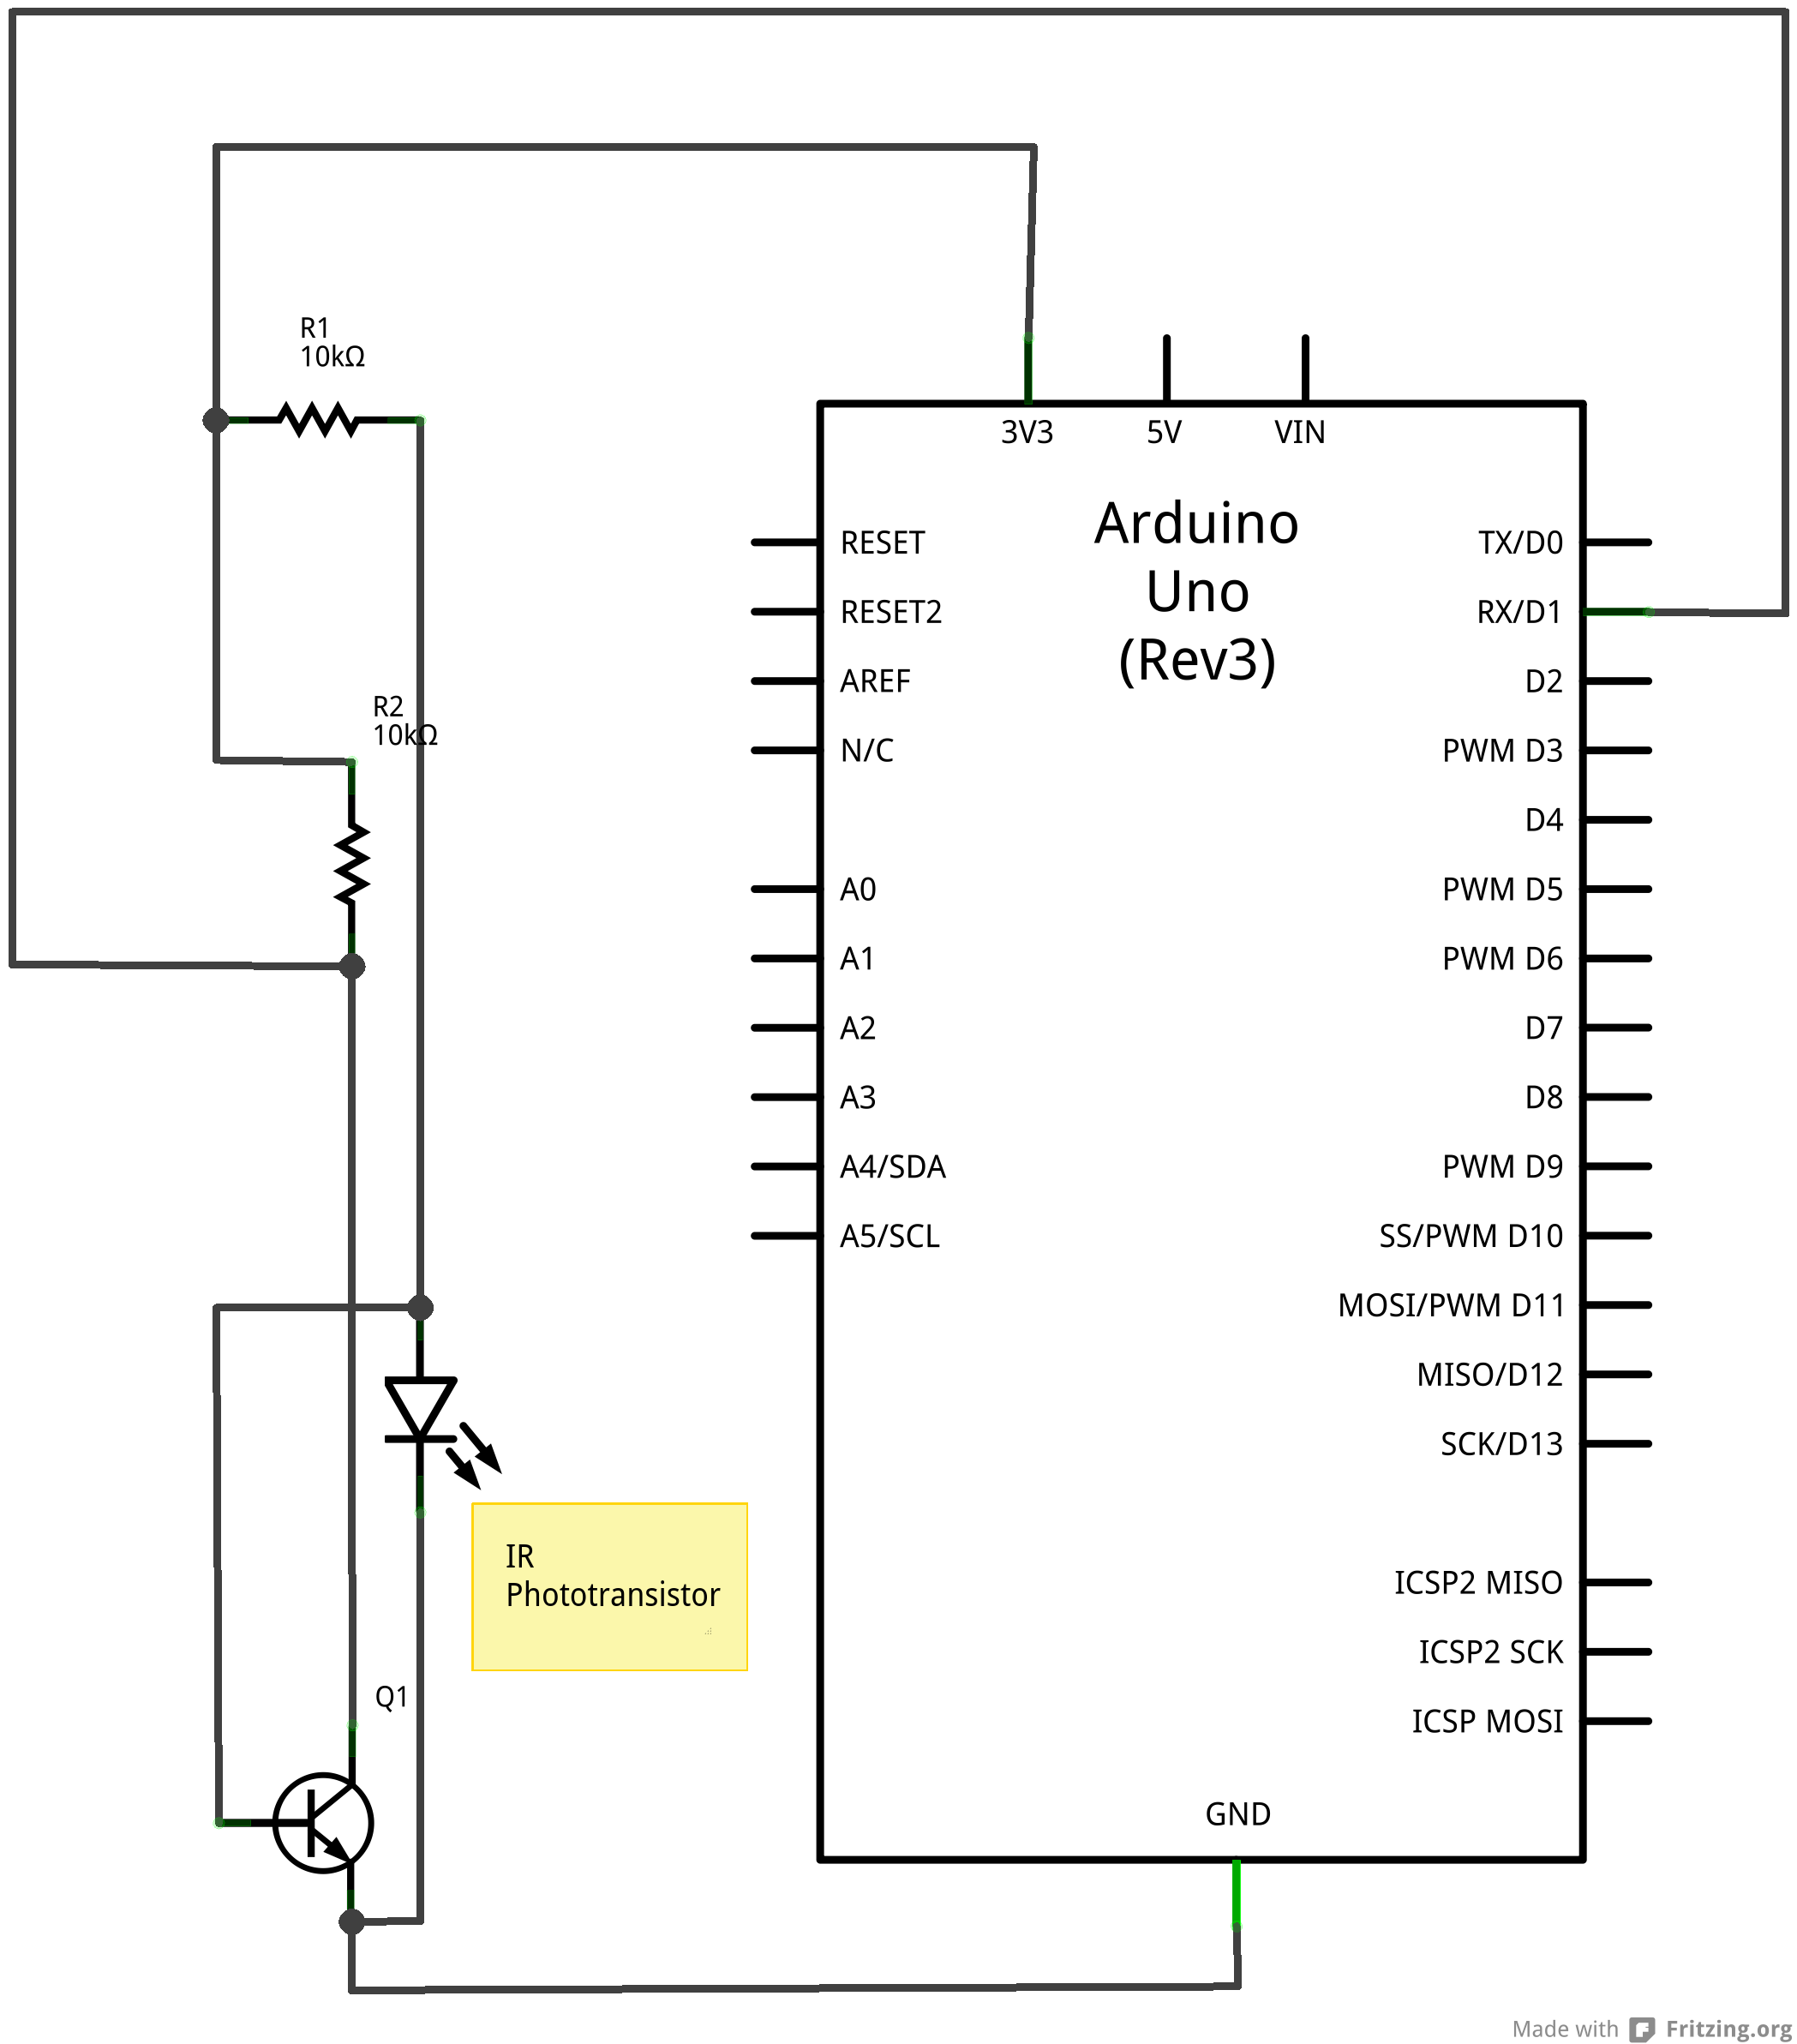
Build the receiver by following the given schematic.
Place the batteries in the transmitter and connect the receiver to the USB port with the USB A-B cable.
Install the PyMouse library for python. In Ubuntu, run the following command: sudo pip install pymouse
Run the program by opening the source-code directory in a terminal and entering the command: python mouse_control.py and press enter.
With the receiver and transmitter both pointed at the reflective surface, press the following pads on the Lilypad to control the mouse.
Pad
Mouse command
3
Move up
5
Move left
9
Move down
12
Move right
7
Left click
11
Right click
Areas for improvement:
This project teaches students about computer-human interface devices, capacitive touch sensors and short-range wireless infrared data transmission by implementing a remote-control mouse. To make this project more practical the following improvements could be made.
Add more infrared LEDs and use an infrared receiver (instead of infrared photo-transistor) to allow for a longer range and a wider capture angle.
Sew the transmitter unit onto a piece of fabric to make the remote-control comfortable to hold.
Solder the receiver unit onto a breadboard with headers that will plug-in nicely into the Arduino.
This lab would be appropriate for high-school students in grade 12 because this project requires an intermediate knowledge of electronics (transistor-transistor-logic) as well as computer programming. High-school courses are available to grade 12 students for both of these subjects.