


No Button, Hassle Free, Easy to Mount Simple Knock-to-Ring Bell System
Video Demonstration
Short demo of how the bell works is shown below:
Objective
The objective of this project is to build a device with a vibration to electrical transducer that alerts the user when somebody is at the door. Unlike a traditional doorbell, this doorbell plays a ring-tone when somebody knocks at the door. It also illuminates an LED to alert the user. It is easier to install than a traditional doorbell because no holes need to be drilled and no wiring needs to be done. The user simply installs batteries and mounts the device on their door.
In this lab, the engineering student will learn to program an ATTINY85, see Figure 1 micro-controller to read sensors, control LEDs and play sounds. This is a step up from programming the Arduino as the student must use a programmer instead of the built-in FTDI converter on the Arduino board.

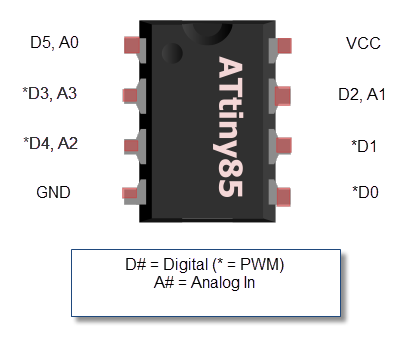
Figure 1 The attiny85 micro-controller is the "brain" of the circuitry — it stores, processes & decides the behaviour of the circuitry according to the program you uploaded to it.
Description of project
This project is controlled by an ATTINY85 micro-controller. It reads analog data from a piezo vibration sensor. Whenever somebody knocks on the door, a small voltage is generated by the piezo vibration sensor, see Figure 2. When the ATTINY85 reads this voltage, it turns on a LED and starts to play a Ring Tone Transfer Language (RTTTL) ring-tone. Once the ring-tone is finished playing, the LED turns off.

Figure 2 A piezo electric device is an electric component that senses mechanical vibrations, and then converts them to electric signals.
Hardware Components
| Item | Quantity |
|---|---|
| ATTINY85 micro-controller | 1 |
| 2N3904 NPN transistor | 1 |
| small 8Ω speaker | 1 |
| 1MΩ resistor | 1 |
| AA batteries and holder | 1 |
| 68Ω resistor | 1 |
| 100Ω resistor | 1 |
| 1MΩ resistor | 1 |
| Jumper Wires | 1 |
Software Components
- Arduino IDE — to program ATTINY85 — www.arduino.cc
- ATTINY support for Arduino - https://github.com/damellis/attiny/ - download at https://github.com/damellis/attiny/archive/master.zip
- Programmer for the ATTINY85, such as the USBtinyISP
Tools
Method
- Install ATTINY support in the Arduino IDE
- Download the following file: https://github.com/damellis/attiny/archive/master.zip
- Extract the zip file and copy the directory attiny located under attiny-master to /home/
/sketchbook/hardware replacing with your Linux username - Compile the program, for your door bell setup, see Figure 3
- Open the file ATTINY85_doorbell.ino in the Arduino IDE.
- Under Tools → Board, select ATtiny85 (internal 8MHz clock)
- Click on the check mark to verify and compile
- Locate the file /tmp/build <xxxxxxxxx> .tmp/ATTINY85_doorbell.CPO.hex, where <xxxxxxxxx> is a number, and copy it to a working directory
- You may now close the Arduino IDE
- Upload the program
- Place the ATTINY85 in the programmer and lock it into place
- From the working directory, run the following command: sudo avrdude -c usbtiny -p attiny85 -U flash:w:ATTINY85_doorbell.CPO.hex
- Unplug the programmer and remove the ATTINY85 once the code upload is complete
- Follow schematic and diagram in Figure 4 and Figure 5, respectively, to build the circuit
- Install on a door, of surface, as shown in Figure 6, so your bell apparatus is able to "sense" knock knock vibrations from somebody's act of knocking.

Figure 3 The program gives instructions to the micro-controller (a type of dedicated processor) how to handle input/output in the doorbell setup.
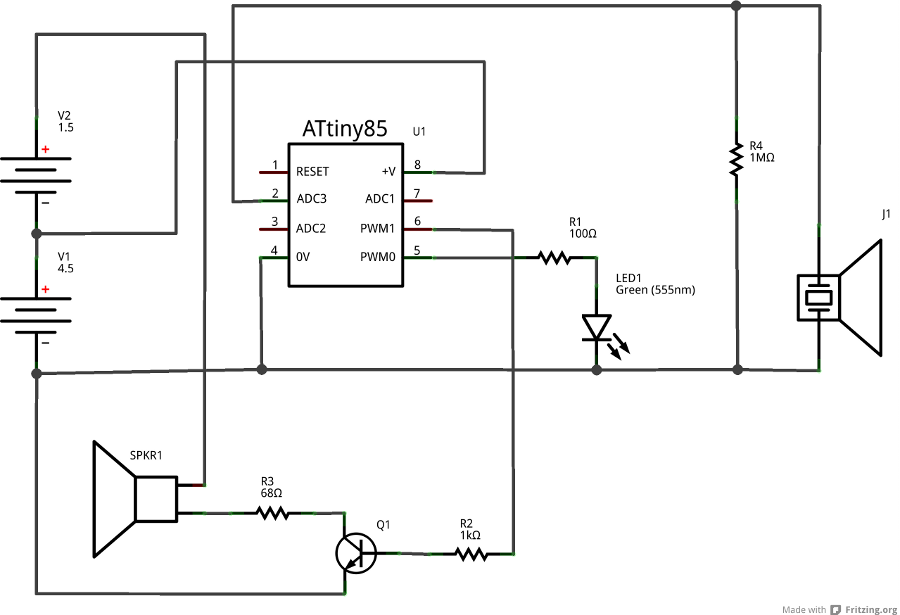
Figure 4 Follow this circuit diagram or schematic to wire together the bell circuitry on a bread board or a prototype board.

Figure 5 Follow this circuit diagram or schematic to wire together the bell circuitry on a bread board or a prototype board.
Further Readings
To have a deepened knowledge in Applications of Transducers, you should first gain a "knowledge scaffold and learning directions" of powerful math, science, computer technologies and engineering. Learn more as a student or teacher from free schools:
Once you feel confident, please Search with keywords "Mechanical Transducers", "Instrumentation Science", "Vibration Transducer Applications" at UOIT Library or Open Textbooks and Open Encyclopediae:

This work is licensed under a Creative Commons Attribution-NonCommercial-NoDerivs 3.0 Unported License.